
Desserts
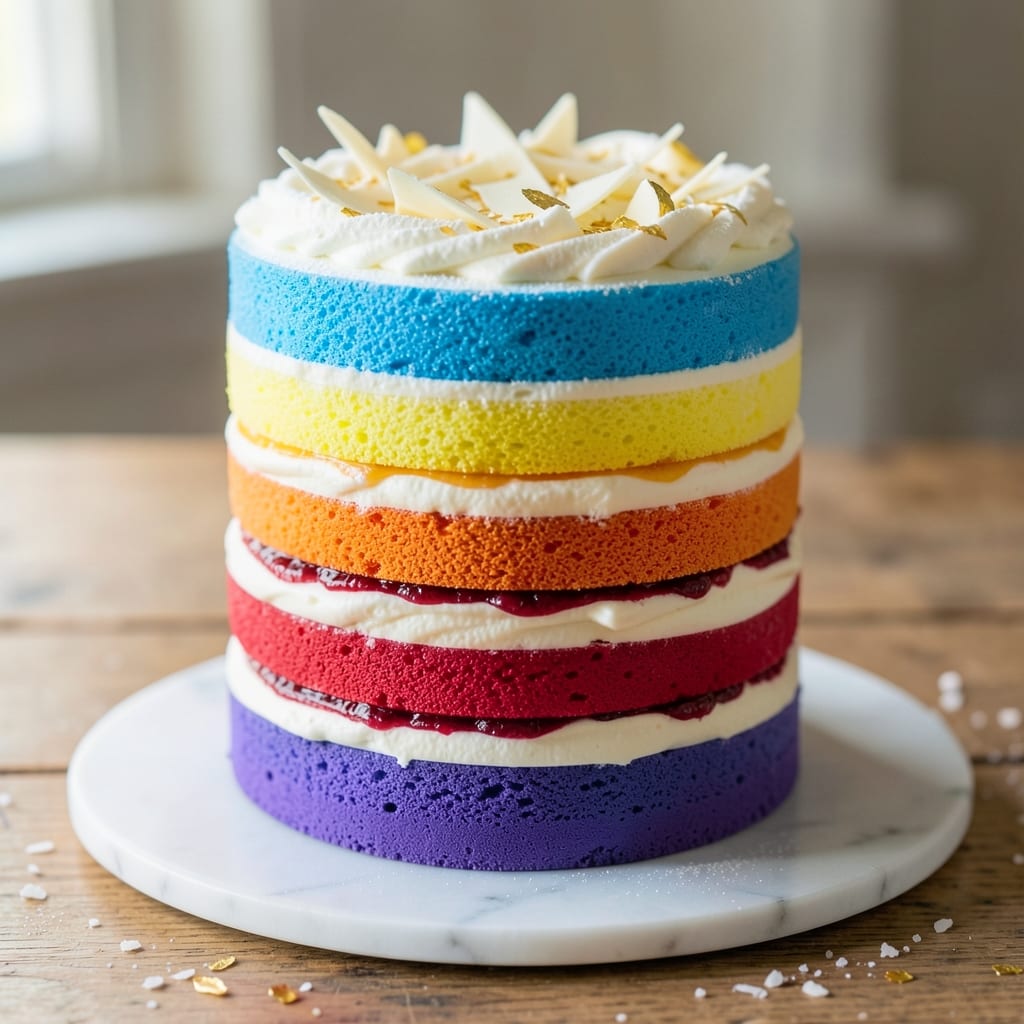
This 7 layer rainbow cake recipe transforms a simple box mix into a showstopping masterpiece that’ll have everyone reaching for seconds. 🌈 The secret lies in vibrant food coloring, precise layering, and a creamy cream cheese frosting that binds it all together—no advanced baking skills required. I’ve baked this for birthdays, holidays, and just-because moments, and it never fails to impress.
The magic starts with baking 7 identical layers of vanilla cake, then transforming them into a rainbow using gel food coloring. Each layer gets its own flavor twist—strawberry jam between the red and yellow, blueberry compote between the blue and green—while the cream cheese frosting holds everything in place without being too sweet. Stability is key, so we’ll use toothpicks and a sturdy cake stand to keep those layers from shifting.
What you’ll end up with is a towering, colorful cake that looks like a dessert masterpiece but comes together in manageable steps. The cream cheese frosting adds a tangy contrast to the sweet layers, and the fruit fillings give each bite a burst of freshness. This isn’t just a cake—it’s a centerpiece that’ll have your guests asking for the recipe.
Perfect for celebrations or treating yourself, this rainbow cake is beginner-friendly but feels like a pro’s creation. Whether you’re decorating for a child’s birthday or a festive gathering, this recipe delivers bold flavors and even bolder colors. Let’s get baking!
Ingredients for 7 layer rainbow cake
Seven identical layers, rainbow colors, and creamy frosting—this cake needs just a few key ingredients.
| Ingredient | Amount | Notes |
|---|---|---|
| Vanilla Cake Mix 🍰 | 3 boxes | High-quality, not generic store brand |
| Large Eggs 🥚 | 6 whole | Room temperature for even baking |
| Unsalted Butter 🧈 | 2 cups | Softened, full-fat for creaminess |
| Whole Milk 🥛 | 1 ½ cups | Room temperature for smooth batter |
| Granulated Sugar 🍚 | 1 ½ cups | For cake layers and frosting |
| Gel Food Coloring 🎨 | 6 tbsp | Rainbow colors (red, orange, yellow, green, blue, indigo, violet) |
| Strawberry Jam 🍓 | ½ cup | Unsweetened, for red/yellow layers |
| Blueberry Compote 🫐 | ½ cup | Homemade or store-bought, unsweetened |
| Cream Cheese 🧀 | 16 oz | Full-fat, room temperature for frosting |
| Heavy Whipping Cream 🥛 | 1 cup | Cold, for frosting stability |
| Powdered Sugar 🍚 | 3 cups | For smooth frosting consistency |
| Vanilla Extract 🌿 | 1 tbsp | Pure, for frosting flavor |
| Toothpicks 📎 | 20 whole | For securing layers |
| Cake Stand 🎂 | 1 whole | Sturdy, for layer stability |
The cake mix is the foundation, but not all brands work equally. Betty Crocker Super Moist or Pillsbury are my go-tos—they bake evenly and hold up to layering. Eggs should be room temperature (takes 30 minutes), and butter? Land O'Lakes unsalted is my secret for that perfect texture. Gel food coloring is a must—liquid dyes bleed into the frosting. WiltonAmericolor are the gold standards. For the fruit fillings, I prefer homemade compote (simmer blueberries with sugar and lemon juice), but store-bought works in a pinch—just drain excess liquid. The cream cheese is non-negotiable: Philadelphia full-fat, always. Skip the low-fat version—it won’t whip right.
No vanilla cake mix? Boxed white cake mix works too, but add 1/4 cup milk to the dry ingredients for moisture. Running short on strawberry jam? Raspberry jam or apricot preserves add different flavors—just adjust sweetness to taste. Blueberry compote can be swapped for blackberry or peach jam, but reduce sugar if using sweetened varieties. The frosting is where things get tricky: if you can’t find full-fat cream cheese, substitute with equal parts mascarpone and cream cheese, but it’ll be less stable. For the coloring, if you’re missing a shade, mix two adjacent colors (e.g., orange + yellow = peach layer). And toothpicks? Wooden skewers work too—just trim to 3-inch lengths.
Batter keeps for 2 days in the fridge, but bake fresh for best results. The frosting can be made 1 day ahead—just whip it again before assembling. Store the cake at room temperature for up to 3 days, covered loosely with plastic. For longer storage, freeze the assembled cake (unfrosted) for up to 2 monthsChill the cake 30 minutes before slicing to keep layers intact. And if you’re nervous about stability, use a cake collar (a cardboard ring) between layers for extra support.
Why You'll Love This Recipe
- Box Mix Magic: I swear by box mixes here—no measuring dry ingredients, no sifting, just crack eggs, melt butter, and mix. The vanilla cake base comes out perfectly moist every single time, even when I forget to preheat the oven.
- Rainbow Every Bite: That creamy buttercream between each layer? It’s where the real joy lives. The milk-soaked cake layers soak up the sweetness just right, and the colors? Pure joy—no one can resist digging in for a second slice.
- Party in a Pan: Honestly, this is my go-to for birthdays, potlucks, or even a "I just want cake" afternoon. The layers stack fast, and the frosting? You can swirl it, pipe it, or just slap it on—no stress, all fun.
- Leftovers? Best Leftovers: Between us, the day-after slices are even better. The cake firms up slightly, the buttercream stays luscious, and it’s the perfect grab-and-go dessert for a week. Plus, you’re using pantry staples—no fancy ingredients wasted.
Step-by-step instructions for assembling a stunning 7-Layer rainbow cake
Here’s how to build your dream rainbow cake—layer by vibrant layer.
👨🍳 Step 1: Prepare the Cake Batter and Divide for Coloring
Preheat your oven to 350°F and grease seven 6-inch round cake pans. In a large mixing bowl, combine 3 boxes of vanilla cake mix, 6 whole large eggs, 2 cups softened unsalted butter, 1.5 cups whole milk, and 1.5 cups granulated sugar. Mix on low speed until just combined—do not overmix or your layers will be dense.
Divide the batter evenly into seven separate bowls. Here’s the key: add 1 tablespoon of gel food coloring to each bowl for your rainbow colors (red, orange, yellow, green, blue, indigo, violet). Mix well until each batter is uniformly colored. For extra vibrancy, I like to add 1 teaspoon of strawberry jam to the red and yellow batters, and 1 teaspoon of blueberry compote to the blue and indigo batters—this enhances the natural hues and adds subtle fruit flavor.
🍳 Step 2: Bake the Layers to Perfect Evenness
Pour each colored batter into a prepared pan, filling them ¾ full. Bake for 25-30 minutes or until a toothpick inserted into the center comes out clean. Let the cakes cool in their pans for 10 minutes, then transfer to a wire rack to cool completely. This step is critical—uneven cooling can cause layers to shift when assembling.
Once fully cooled, level the tops of each cake using a serrated knife if needed. I press down firmly and slide the knife horizontally to create an even surface. This ensures your frosting layers will be smooth and professional-looking. Pro tip: Wrap each cake layer in plastic wrap and refrigerate for 30 minutes before frosting—this prevents crumbling when you slice.
🥘 Step 3: Create the Cream Cheese Frosting
In a stand mixer fitted with the paddle attachment, beat 16 oz of room-temperature cream cheese and 2 cups of powdered sugar on medium speed until smooth and creamy. Add 1 cup of cold heavy whipping cream and mix until soft peaks form. Finally, add 1 tablespoon of vanilla extract and mix for another 30 seconds until fully incorporated.
Here’s the secret to flawless frosting: chill your bowl and beaters for 10 minutes before starting. This prevents the cream cheese from melting too quickly, ensuring your frosting stays stable. If the frosting is too thick, add 1 tablespoon of milk at a time until it reaches a spreadable consistency—it should be thick enough to hold its shape but still pipe smoothly.
🔪 Step 4: Assemble the Rainbow Layers with Precision
Place the first cake layer (red) on the cake stand. Spread a thin layer of frosting (about ¼ inch) on top, then pipe a 1-inch thick ring of frosting around the edges. This creates a "dam" to hold the filling. Add 2 tablespoons of strawberry jam to the center of the red layer, then place the orange layer on top. Repeat this process for all seven layers, alternating between jam and blueberry compote for the fruit fillings.
After the final layer is in place, spread a thin layer of frosting over the entire top and sides. Insert 20 toothpicks vertically around the edges to secure the layers while the frosting sets. Place the cake in the refrigerator for 1 hour to firm up—this prevents the layers from shifting when you decorate.
⏰ Step 5: Decorate and Finalize for Show-Stopping Results
Once the frosting is set, remove the toothpicks and apply a final ½-inch thick layer of frosting to the entire cake. Use an offset spatula to smooth the sides and create clean lines. For extra flair, pipe a swirl pattern on top with leftover frosting or add rainbow sprinkles. Let the cake sit at room temperature for 30 minutes before slicing—this allows the frosting to firm up just enough to hold its shape.
Slice into 12 perfect portions and serve immediately. The contrast of the vibrant layers, creamy frosting, and fruity fillings will make this cake the centerpiece of any celebration. Trust me, the first bite is pure magic—each layer delivers a burst of color and flavor in perfect harmony!
Pro Tips For Making 7 Layer Rainbow Cake
- Chill the Cake Layers: Let each vanilla layer cool for 10 minutes in the pan, then transfer to a wire rack to cool completely—this prevents soggy bottoms when stacking. I learned this the hard way after my first attempt turned into a sticky mess.
- Use Room-Temperature Butter: Softened butter (65°F) blends smoother with the cake mix and eggs, ensuring even layers without lumps. Stick it in the microwave for 20-second bursts if it’s straight from the fridge—no one likes fighting dough.
- Don’t Overmix the Batter: Mix just until combined—overmixing makes the cake dense and tough, which ruins the light, fluffy texture you need for clean layers. I used to beat it like I was punishing the batter, then realized "just combined" was the magic spot.
- Level the Layers Precisely: Use a serrated knife to trim each cooled layer to an even height—uneven layers mean uneven frosting and a wobbly cake. A ruler helps keep the knife straight; trust me, your cake will look like it was made by a pro.
Common mistakes when making great 7 layer rainbow cake
Uneven Baking
If your cake layers bake unevenly—some domed, others flat—it’s usually from inconsistent oven heat or overmixing the batter. I’ve seen this happen when using a crowded oven or when the batter is mixed too vigorously. Solution: Rotate your pans halfway through baking and avoid overmixing—stop as soon as the ingredients are combined. For extra insurance, bake one layer at a time if your oven struggles with heat distribution. Uneven layers will make stacking difficult and create gaps in your final cake. 🔥
Color Bleeding
Gel food coloring is essential, but liquid dyes will bleed into your frosting and ruin that vibrant rainbow effect. I’ve made this mistake with cheap, watery dyes that seep through layers. Solution: Stick to high-quality gel coloring like Wilton or Americolor, and avoid overmixing the batter after adding color—just swirl it in until evenly distributed. For extra protection, let the colored layers cool completely before frosting. If you notice bleeding during assembly, use a thin layer of plain buttercream as a barrier between colored layers.
Frosting Too Thin
If your cream cheese frosting spreads like water or doesn’t hold its shape, it’s usually because the cream cheese wasn’t cold enough or the butter wasn’t properly softened. I’ve ruined multiple cakes this way—trust me, this is a game-changer. Solution: Chill your mixing bowl and beaters for 10 minutes before starting, and use cold heavy whipping cream. If the frosting still feels too soft, add 1 tablespoon of powdered sugar at a time until it thickens. For extra stability, whip in 1 teaspoon of unflavored gelatin (dissolved in 1 tablespoon warm water) for a firmer texture.
Layers Shifting
Nothing’s more frustrating than a beautifully stacked cake that collapses when you try to slice it. This happens when layers aren’t properly secured or the cake isn’t chilled long enough. Solution: Use toothpicks or wooden skewers to secure each layer, and refrigerate the cake for at least 1 hour before decorating. For extra support, create a cake collar (a cardboard ring) between layers to prevent spreading. I’ve also found that leveling the cake tops with a serrated knife makes a huge difference—uneven surfaces cause instability.
Overmixing the Batter
Overmixing develops gluten in the cake, making it dense and tough instead of light and fluffy. I’ve seen this turn a perfect cake into a brick—not ideal for a rainbow masterpiece. Solution: Mix the batter on low speed just until combined (about 1 minute). If you’re using a hand mixer, pulse in short bursts. For extra insurance, fold in any wet ingredients last and mix gently. The goal is a smooth, pourable batter—not a thick, elastic dough.
Skipping the Chill Step
Rushing the assembly without chilling the cake layers is a recipe for disaster—literally. The frosting will melt, the layers will slide, and your beautiful rainbow will turn into a colorful mess. Solution: Always refrigerate the cake for 1 hour before decorating. If you’re in a hurry, pop it in the freezer for 20 minutes—just don’t overdo it, or the frosting will get too firm to work with. This step is non-negotiable for stability, so plan ahead and give your cake the time it needs to set properly. ✨
Nutrition facts
Frequently asked questions
Can I make this rainbow cake with fewer layers?
The magic of this cake comes from all seven layers, but you can absolutely adapt it! Try a 3-layer version with red, yellow, and blue for a kid-friendly size, or a 5-layer version for a smaller celebration. Just reduce the cake mix proportionally and adjust the frosting quantity. The key is keeping the layers even in thickness for stability.
How do I prevent the layers from sliding when slicing?
This is all about proper prep! First, chill the cake for 2 hours before slicing to firm up the frosting. Second, use toothpicks or wooden skewers vertically around the edges during assembly. For extra insurance, create a cake collar (a cardboard ring) between layers to contain the frosting. Slice with a serrated knife and warm water on the blade for clean cuts.
What's the best way to store leftovers?
Store the cake at room temperature for up to 3 days, covered loosely with plastic wrap. For longer storage, freeze the unfrosted cake (wrapped tightly) for up to 2 months. Thaw overnight in the fridge, then refrost with a thin layer before serving. Never freeze the fully frosted cake—it'll get soggy when thawed.
Can I substitute the fruit fillings?
The strawberry jam and blueberry compote are just suggestions. Try raspberry jam, peach preserves, or even mango puree for tropical flavors. For a lighter option, use whipped cream between layers instead of fruit. Just ensure your fillings aren't too watery—they can weaken the cake structure.
How do I make this cake gluten-free?
Use a 1:1 gluten-free vanilla cake mix (like King Arthur or Bob's Red Mill) and follow the same baking instructions. Replace regular flour in any recipes with gluten-free flour blends. For the frosting, ensure your cream cheese is gluten-free certified. The texture will be slightly different but still delicious! Test with a small batch first to adjust coloring intensity.