
Desserts
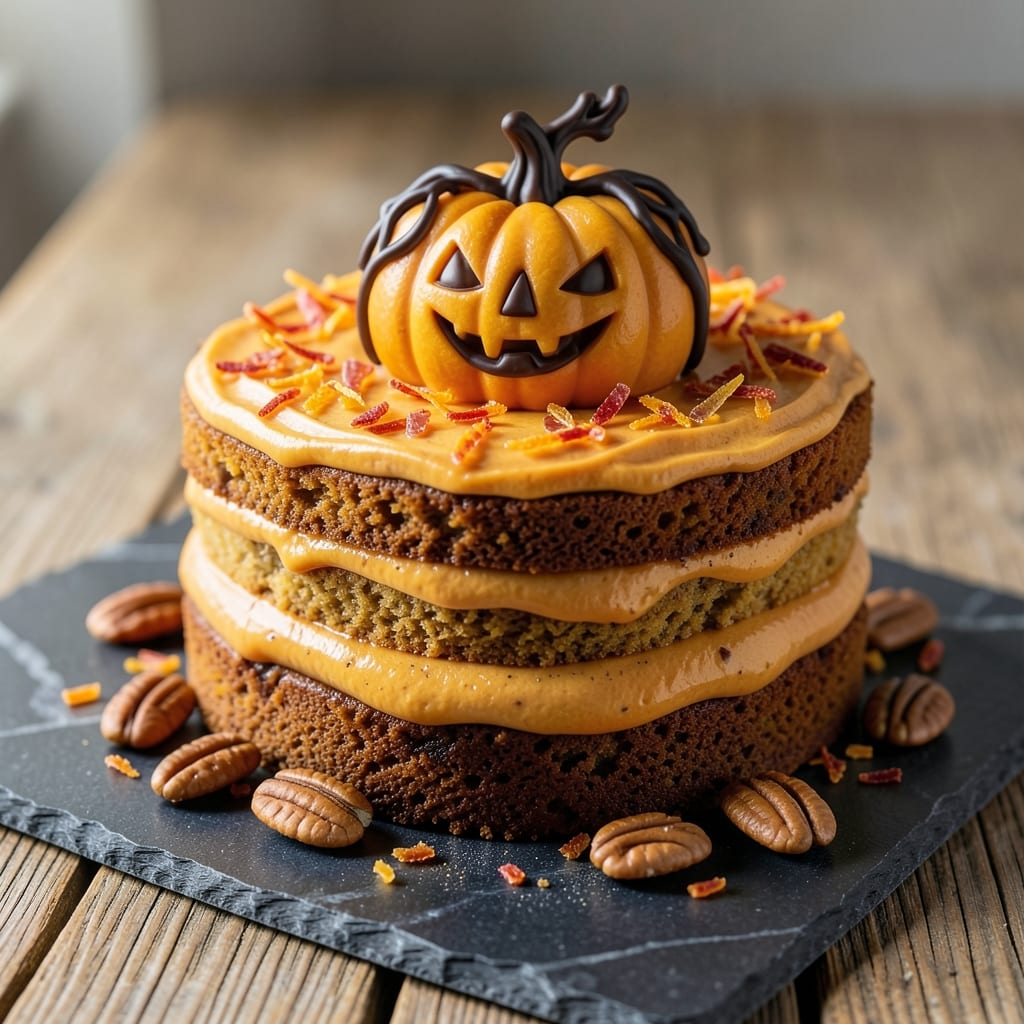
This 3D pumpkin cake recipe transforms traditional dessert into a stunning autumn centerpiece with stacked layers and edible fondant supports. 🍂 The secret lies in a moist, spice-infused cake base that bakes evenly for perfect leveling—critical for structural stability. Unlike flat cakes, this design incorporates fondant bridges that create height while maintaining balance, making it ideal for Halloween displays or harvest-themed celebrations.
The recipe begins with a three-layer pumpkin cake—each tier baked in a round pan for uniform thickness. Between layers, we use buttercream frosting not just for flavor but as a structural adhesive, ensuring clean edges when stacking. The real magic happens with fondant supports: hand-sculpted arches and leaves that lift the cake into a 3D illusion while supporting the weight of upper tiers.
What makes this recipe professional-grade is the assembly technique: precise leveling with a serrated knife, strategic fondant placement, and a weighted dowel system to prevent collapse. The result? A cake that looks like it belongs in a bakery window—golden spice cake with crisp fondant details that catch the light and impress every guest.
Perfect for holiday gatherings or special occasions, this cake requires patience but delivers restaurant-quality presentation with minimal equipment. Whether you're decorating for Halloween or a cozy autumn dinner, this recipe turns baking into edible art. Let's build your showstopper dessert.
Ingredients for 3d pumpkin cake
Precision ingredients for a showstopping 3D pumpkin cake with structural integrity and restaurant-quality detail.
| Ingredient | Amount | Notes |
|---|---|---|
| Pumpkin Puree 🎃 | 1 ½ cups | Unsweetened, canned or homemade |
| All-Purpose Flour 🌾 | 3 ½ cups | Sifted, for even texture |
| Granulated Sugar 🍚 | 2 ½ cups | White or light brown |
| Unsalted Butter 🧈 | 1 ½ cups | Cold, cubed for buttercream |
| Large Eggs 🥚 | 6 whole | Room temperature |
| Pumpkin Pie Spice 🌶️ | 2 tsp | For authentic flavor |
| Ground Cinnamon 🍃 | 1 ½ tsp | Freshly ground preferred |
| Ground Ginger 🌿 | ½ tsp | For warmth |
| Ground Nutmeg 🌿 | ¼ tsp | Freshly grated nutmeg |
| Salt 🧂 | ½ tsp | Diamond Crystal preferred |
| Heavy Cream 🥛 | 1 cup | Cold for buttercream |
| Powdered Sugar 🍚 | 4 cups | Sifted for smooth frosting |
| White Fondant 🎨 | 2 lbs | Store-bought or homemade |
| Vegetable Shortening 🧈 | ½ cup | For fondant pliability |
| Corn Syrup 🍯 | 1 tbsp | For fondant smoothness |
The pumpkin puree and spice blend are non-negotiable for authentic flavor. Libby's unsweetened pumpkin is a reliable choice, but homemade puree adds depth. For the spice mix, Penzeys brand offers pre-blended pumpkin pie spice with consistent quality—critical for even flavor distribution across all three tiers. The fondant requires high-quality white fondant like Wilton or homemade versions with corn syrup for elasticity. Room-temperature eggs ensure proper emulsification in the cake batter, preventing dryness that could compromise structural integrity during stacking.
No pumpkin pie spice? Combine 1 tsp cinnamon, 0.5 tsp ginger, 0.25 tsp nutmeg, and 0.25 tsp cloves for a close approximation. Substitute heavy cream with Greek yogurt for a lighter texture, though it may alter the frosting's stability. For fondant alternatives, marzipan works for smaller cakes but lacks the pliability needed for large supports. The vegetable shortening in fondant can be replaced with equal parts butter and lard, though texture may vary slightly. Always sift powdered sugar for buttercream to prevent graininess that could interfere with clean stacking.
Store cake tiers in an airtight container with parchment between layers for up to 2 days before assembly. Fondant supports should be shaped and stored in a sealed container with a damp towel to maintain pliability for up to 3 days. The assembled cake requires refrigeration for no more than 6 hours before serving to prevent fondant from becoming sticky. For long-term storage, freeze the assembled cake (unfrosted) for up to 2 months, thawing at room temperature before decorating.
Why You'll Love This Recipe
- Here’s what sold me: the eggs and sugar create a tender crumb that stays fresh for days. No dry, sad cake here—just that perfect balance of spiced sweetness in every bite.
- Pantry-Friendly Magic: I swear by this one—no specialty ingredients, just basics you already own. That rich pumpkin puree and warm butter blend into something so smooth, you’ll forget it’s this simple.
- Moist Without Effort: Here’s what sold me: the eggs and sugar create a tender crumb that stays fresh for days. No dry, sad cake here—just that perfect balance of spiced sweetness in every bite.
- Layered for Fun: Between us, the 3D effect is a game-changer for parties or just because. Kids love picking their spot, and it’s way easier than piping—just fold in the batter and let gravity do the work.
Step-by-step instructions for 3D pumpkin cake assembly
A three-tiered pumpkin cake requires precision and patience—here's how to build it with structural integrity.
👨🍳 Step 1: Prepare the Cake Layers for Stacking
Bake the cake batter in three 8-inch round pans according to package directions, then cool completely on a wire rack. I wait until the cakes are completely cool—this prevents warping when you remove them from the pans. Once cooled, run a thin offset spatula around the edges to loosen the cake from the pan, then gently tap the pan on the counter to release.
Place each cake layer on a parchment-lined tray and level the tops if needed using a serrated knife. For even stacking, I recommend using a cake leveler or carefully slicing off any domed portions. The goal is perfectly flat surfaces—this ensures your fondant supports will adhere cleanly and the tiers won't wobble. Label each layer with a toothpick (top, middle, bottom) to keep track during assembly.
🍳 Step 2: Create Fondant Supports for Structural Stability
Roll out ½ pound of the white fondant between two sheets of parchment paper to ⅛-inch thickness using a rolling pin. Cut three 1-inch wide strips—one 12-inch long (for the bottom tier), one 10-inch long (middle tier), and one 8-inch long (top tier). These will serve as the vertical supports between each cake layer.
For the horizontal supports, roll out the remaining 1.5 pounds of fondant to ¼-inch thickness and cut three 2-inch wide strips—each 8 inches long (one for each tier). Use a fondant smoother to create beveled edges on all strips. The beveled edges help the fondant adhere better to both the cake and the vertical supports. Keep all fondant pieces covered with parchment until ready to use to prevent drying.
🥘 Step 3: Assemble the Cake Layers with Fondant Supports
Begin with the bottom tier. Place it on a cake stand or turntable and apply a thin layer of buttercream to the top surface. Press one 12-inch vertical support into the buttercream at a 45-degree angle from the center outward, then secure it with a small dab of edible glue (or a tiny dollop of leftover buttercream). Repeat with the 8-inch horizontal support, positioning it perpendicular to the vertical support to create an "L" shape.
Place the middle tier on top of the supports, ensuring it sits flush against both fondant pieces. Apply buttercream to its top surface and repeat the process with the 10-inch vertical support and 8-inch horizontal support. Finally, position the top tier on the remaining supports. The fondant pieces should create a stable, triangular framework—this prevents the tiers from shifting during transport or serving.
🔪 Step 4: Apply Fondant and Final Decorations
Roll out the remaining fondant to ¼-inch thickness and drape it over the top tier, smoothing it with your fingers to eliminate air bubbles. Use a fondant smoother to create clean edges, then trim any excess with a sharp fondant knife. For a polished look, I press a metal cake comb into the sides to create texture before the fondant sets.
Let the fondant set for 15-20 minutes at room temperature before adding final decorations. I like to pipe buttercream rosettes around the base of each tier and add edible gold leaf accents for elegance. The key here is patience—rushing the fondant application can cause cracks or uneven surfaces. If you notice any imperfections, gently smooth them with a damp fondant brush before they dry completely.
Pro Tips For Making 3d Pumpkin Cake
- Preheat Like a Pro: Crank that oven to 350°F and let it scream for 15 minutes before baking—this cake’s layers depend on it. I learned this the hard way when my first attempt emerged with a sad, uneven dome. The buttercream filling needs a hot oven to set properly, or you’ll end up with a wobbly tower.
- Whip Butter to Room Temp: Take the butter out of the fridge two hours early—no, really, set a timer. Cold butter in this cake means dense layers and a fight with the mixer. Room-temp butter creams smoothly with sugar and incorporates air, which is the non-negotiable secret to that light, fluffy texture.
- Sift That Flour Twice: Don’t just dump the flour—sift it once into the dry ingredients, then sift it again right before folding it into the wet mix. Lumps in pumpkin cake are a dealbreaker, and this recipe’s structure relies on even distribution. (Yes, even if you’re impatient like me.)
- Chill Layers Before Stacking: Pop your baked layers in the fridge for 10 minutes before assembling—just enough to firm up without drying out. I was skeptical until I tried it: the buttercream stays put, and the final cake holds its shape instead of collapsing into a sad puddle. (Your future self will thank you.)
Creative variations of this 3d pumpkin cake
Halloween Spooky Designs
Transform your cake into a Halloween centerpiece with fondant jack-o'-lanterns or bat silhouettes. Use a sharp fondant knife to carve pumpkin faces into the top tier, then paint with edible black food coloring for eyes and mouth. For bats, roll out fondant into thin wings and attach them to the sides with edible glue. I like adding glow-in-the-dark edible paint for a magical effect under blacklight. 🎃
Autumn Harvest Theme
Celebrate fall flavors with fondant leaves and acorns in warm orange, yellow, and brown hues. Roll out fondant to ⅛-inch thickness, cut leaf shapes with a fondant cutter, and press them onto the cake sides. For acorns, use a small round cutter for the cap and mini fondant balls for the tops. Add gold leaf accents to the fondant for a luxe touch. Store-bought Wilton leaf cutters make this step effortless. 🍂
Winter Wonderland Version
Swap pumpkin spice for vanilla and cinnamon in the cake batter, then decorate with snowflake fondant cutouts and silver leaf accents. Use white fondant to create snow-covered branches around the cake stand. For extra sparkle, dust with edible silver or pearl luster powder. This version works perfectly for Christmas parties or winter gatherings. ❄️
Tropical Luau Twist
Ditch the autumn theme and go tropical with pineapple fondant toppers and palm leaf designs. Use yellow fondant for pineapples and green fondant for leaves, then add edible gold leaf for a resort-style vibe. Swap pumpkin spice for coconut extract in the cake batter. This variation is ideal for summer weddings or beach-themed parties. 🍍
Minimalist Modern Style
For a sleek, contemporary look, keep the fondant smooth and matte with clean geometric lines. Use a fondant smoother to create sharp edges and minimalist patterns like diagonal stripes or dot clusters. Stick to neutral tones (white, gray, or soft beige) for a sophisticated finish. This style works beautifully for wedding cakes or modern dessert displays. ✨
Kids' Birthday Fun
Let the little ones get creative with colorful fondant characters like animals, unicorns, or superheroes. Pre-cut fondant shapes and let kids decorate them with edible markers or sprinkles. For extra fun, add fondant "hats" or whiskers to make the cake interactive. This version is perfect for birthday parties and keeps kids engaged during decorating. 🦄
Nutrition facts
Frequently asked questions
Can I make this 3D pumpkin cake without fondant?
Yes, you can! Use marzipan or rolled fondant alternatives like buttercream-covered cake boards for supports. For a simpler approach, create buttercream bridges by piping thick ropes between tiers—just let them set for 30 minutes before stacking. The key is ensuring your supports are wide enough (at least 1-inch thick) to bear the weight of upper layers.
How do I prevent my cake tiers from shifting during transport?
Wrap the assembled cake in plastic wrap and place it in a cardboard cake box with packing peanuts around the sides. For extra stability, secure each tier with dowels inserted vertically through the center before adding fondant supports. If transporting horizontally, place the box on its side and pad the top with foam padding to prevent toppling.
What's the best way to level cake layers for perfect stacking?
Use a cake leveler or serrated knife to trim domed tops. For precision, place the cake on a level surface and gently press down with a plate to identify high spots. Always level after cooling completely—warm cakes will continue to settle and cause uneven surfaces. A laser level tool helps for extra accuracy with multiple tiers.
Can I bake the cake layers ahead of time?
Wrap baked layers in plastic wrap and store at room temperature for up to 3 days or freeze for 1 month. Thaw overnight in the fridge before assembly. The frosting and fondant should be made the day of decorating to maintain pliability. For long-term storage, freeze the unfrosted tiers separately—this prevents moisture buildup that could weaken fondant adhesion.
How do I fix fondant that's cracking or drying out?
Dampen cracked fondant with a damp sponge or fondant brush, then gently press the pieces back together. For dried-out fondant, knead in 1 tsp corn syrup or water until pliable. Work quickly—fondant loses elasticity when overhandled. Store unused fondant in an airtight container with a damp paper towel to maintain moisture for up to 5 days.