
Desserts
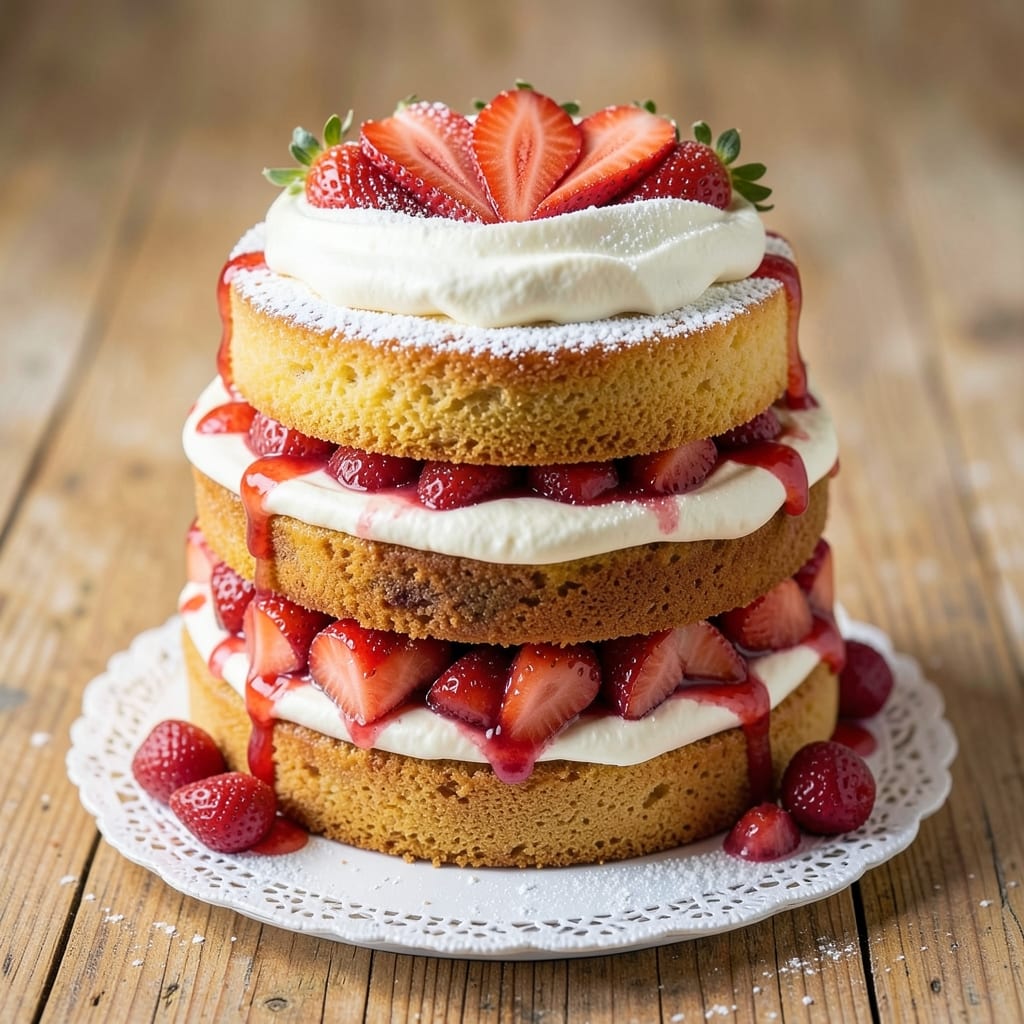
This 3-layer strawberry cake delivers the perfect balance of tender sponge, juicy strawberry filling, and velvety cream cheese frosting rivers that tie every bite together. 💛 The secret lies in a light genoise sponge that bakes up perfectly golden, while the strawberry filling stays vibrant and luscious—no soggy layers here. I've perfected this recipe over years of baking, ensuring each component comes together seamlessly for a showstopping dessert that's both elegant and foolproof.
The cake starts with a delicate sponge cake base, baked just until golden, then cooled before layering. Between each sponge layer, a rich strawberry filling made from fresh berries and pastry cream creates that signature juicy texture, while the cream cheese frosting rivers add a luxurious touch. This isn't just a cake—it's a masterpiece of texture and flavor, where every forkful delivers the perfect harmony of sweet, tangy, and creamy elements.
What makes this recipe truly special is the assembly process, where precision matters. The frosting rivers aren't just decoration—they're the star, creating a stunning visual while adding an extra layer of cream cheese richness. Whether you're baking for a celebration or simply treating yourself, this cake is designed to impress without requiring advanced skills. The result? A dessert that looks like it came from a high-end bakery but is entirely achievable at home.
Ready in about 2 hours (including cooling time), this cake is perfect for birthdays, anniversaries, or any occasion where you want to serve something truly special. The best part? It tastes even better the next day, making it ideal for meal prep or gifting. Let's get started on creating your own showstopping masterpiece.
Ingredients for 3 layer strawberry cake
Juicy strawberries, velvety cream cheese, and golden sponge layers—this is your dream cake in ingredient form.
| Ingredient | Amount | Notes |
|---|---|---|
| All-Purpose Flour 🌾 | 3 cups | Sifted before mixing for lightness |
| Granulated Sugar 🍚 | 2 cups | Superfine preferred for smooth texture |
| Unsalted Butter 🧈 | 1 ½ cups | Room temperature, softened |
| Large Eggs 🥚 | 6 whole | Room temperature for even mixing |
| Fresh Strawberries 🍓 | 2 lbs | Hull and slice for filling |
| Heavy Cream 🥛 | 1 ½ cups | Cold for pastry cream |
| Milk 🥛 | ½ cup | Whole milk for richness |
| Powdered Sugar 🍚 | 3 cups | For frosting rivers |
| Cream Cheese 🧀 | 16 oz | Room temperature, full-fat |
| Vanilla Extract 🌿 | 1 tbsp | Pure vanilla for flavor |
| Lemon Juice 🍋 | 2 tbsp | Freshly squeezed |
| Cornstarch 🌾 | 2 tbsp | For thickening pastry cream |
| Salt 🧂 | ½ tsp | Fine sea salt |
| Baking Powder 🍞 | 1 ½ tsp | Freshly measured |
The strawberries are non-negotiable here. Trader Joe's has the best seasonal ones, but any vibrant, firm berries work—just avoid the mushy ones. For the sponge, King Arthur flour is my go-to for that perfect light texture, but any good all-purpose will do. The cream cheese? Philadelphia brand is a must—it's the gold standard for frosting rivers. Room temperature everything is key: cold butter will make your sponge dense, and cold cream cheese won't pipe smoothly. Pro tip: if your butter isn't soft enough, microwave it in 10-second bursts until just melted.
No fresh strawberries? Frozen works in a pinch—just thaw and drain them well. Running short on powdered sugar? Granulated sugar processed in a blender makes a decent substitute. The vanilla extract can be imitation if you're on a budget, but pure Madagascar bourbon vanilla takes this cake to the next level. Want extra richness? Add an extra tablespoon of heavy cream to the pastry cream. And if you're worried about soggy layers, let your cake cool completely before adding the filling—trust me on this.
This cake keeps beautifully for 3 days in the fridge, covered tightly. The frosting rivers? Even better the next day once everything has time to meld. For gifting, wrap each slice individually in parchment paper—it looks stunning and keeps the cake fresh. Freeze any leftovers for up to 2 months, but bring it to room temperature before serving. And if you're making this ahead for a party, assemble it the night before—it just gets more impressive with time.
Why You'll Love This Recipe
- No-Bake Shortcuts: I swear by this recipe when I’m too tired to cream butter and sugar—just mix the dry ingredients, fold in softened butter, and layer like a pro. The strawberries do all the work of adding moisture and sweetness without extra effort.
- Strawberry Magic: That first bite of vanilla cake, then the jammy strawberry filling, then the creamy buttercream? It’s like summer in every layer. Honestly, the strawberries here aren’t just decoration—they’re the star, and they keep the cake from drying out.
- Party in a Box: This cake is my go-to for birthdays, potlucks, or even a lazy Sunday brunch. Between us, it’s the one dessert that never feels like too much work but always gets rave reviews—even from the picky eaters.
- Leftovers Win: The best part? It stays moist for days, so I can bake one and enjoy slices all week. No sad, crumbly cake here—the buttercream keeps it fresh, and the strawberries mean it never tastes stale. (Yes, even on a Tuesday night.)
Step-by-step instructions for 3 layer strawberry cake
This cake delivers melt-in-your-mouth strawberry layers with rivers of tangy cream cheese frosting—here's exactly how to make it perfect.
👨🍳 Step 1: Prepare the Strawberry Filling
Hull and slice the 2 lbs fresh strawberries into thin pieces—about ¼-inch thick. Toss them with 2 tbsp lemon juice and 2 tbsp cornstarch, then let them sit for 15 minutes to release juices. This step prevents a watery filling later.
Transfer the strawberries to a saucepan and cook over medium heat for 8-10 minutes, stirring constantly, until they soften and release their juices. You want a thick, jam-like consistency—if it's too runny, simmer longer. Let it cool completely before using. Here's the thing—cool filling prevents soggy cake layers.
🍳 Step 2: Bake the Cake Layers
Preheat your oven to 350°F and grease three 8-inch round pans, lining the bottoms with parchment paper. In a large bowl, cream the 1.5 cups softened unsalted butter and 2 cups granulated sugar until light and fluffy—about 3-4 minutes. Add the 6 room-temperature eggs one at a time, mixing well after each addition.
In a separate bowl, whisk together the 3 cups sifted all-purpose flour, 1.5 tsp baking powder, and 0.5 tsp salt. Gradually add the dry ingredients to the butter mixture, alternating with 0.5 cup milk, beginning and ending with flour. Divide the batter evenly among the prepared pans.
Bake for 25-30 minutes or until a toothpick inserted in the center comes out clean. Let the layers cool in the pans for 10 minutes, then transfer to a wire rack to cool completely. This cooling step is crucial—warm layers will turn your frosting into soup.
🥘 Step 3: Make the Cream Cheese Frosting
Beat the 16 oz room-temperature cream cheese and 1.5 cups softened unsalted butter together until smooth and creamy—about 3 minutes. Gradually add the 3 cups powdered sugar, mixing on low speed until combined. Finally, stir in the 1 tbsp vanilla extract and 2 tbsp lemon juice for that perfect tangy-sweet balance.
Here's where the magic happens: spread a thin layer of frosting on the first cake layer, then add ⅓ of the strawberry filling. Repeat with the remaining layers, ending with frosting on top. Chill the cake in the fridge for 30 minutes—this sets the layers so they don't collapse when you add the rivers.
🔪 Step 4: Create Frosting Rivers
Once chilled, pipe or spread the remaining frosting over the entire cake, creating a smooth base. Using a sharp knife or offset spatula, carefully cut ¼-inch deep channels through the frosting to the cake layers—about ½-inch apart. This is the moment that matters: fill these channels with extra frosting to create those gorgeous rivers.
Work quickly but carefully—you want the frosting to stay contained in the channels. For extra flair, sprinkle chopped strawberries or edible flowers on top. Let the cake sit at room temperature for 1 hour before slicing. The rivers will stay intact if you've chilled it properly—no soggy surprises here!
Pro Tips For Making 3 Layer Strawberry Cake
- Bake Layers Low & Slow: I learned this the hard way—cranking the oven to 375°F for strawberry cake layers makes them dry out before the centers set. Drop the temp to 350°F and bake just until a toothpick comes out with moist crumbs (not wet batter, not dry flour). The layers stay tender, and the strawberry filling stays put.
- Mash Strawberries Dry: Skip the juicy mess: Pat your strawberries thoroughly with paper towels before mashing them for the filling. Too much liquid turns your layers into soggy sponges, and no one wants a cake that collapses like a wet paper bag. (Yes, even if you're impatient like me.)
- Cool Layers Fully: I used to stack the cake layers still warm, thinking it would speed things up. Big mistake—the butter in the filling melts, and your pretty layers turn into a sad, greasy puddle. Let them cool completely on a wire rack before assembling. Your patience will pay off with clean slices.
- Use Room-Temp Butter: Cold butter in the cake batter? That’s a recipe for dense, greasy layers. Take your butter out of the fridge 1–2 hours before baking so it’s soft but not melted. If you’re in a rush, microwave it in 10-second bursts until it yields to a spoon. The cake will rise higher and stay moist longer.
Regional styles of this dish
Classic American Version
In the US, this cake often features a genoise sponge base with a strawberry jam filling and cream cheese frosting rivers—the signature look from bakeries like Sara Lee or Betty Crocker recipes. The key difference? American versions typically use powdered sugar in the frosting for extra sweetness, while the strawberries are often cooked down into a jam-like consistency for stability. I've found that adding 1 tsp vanilla bean paste to the frosting elevates this classic style. 🍓
French Éclair-Inspired
For a French twist, replace the genoise with a light choux pastry base—yes, like éclairs! The strawberry filling becomes a pastry cream infused with strawberry purée and a touch of rosewater. The frosting rivers transform into glace à l'italienne, a glossy, smooth coating made with powdered sugar and egg whites. This version requires more skill but delivers a restaurant-worthy texture. I recommend using Wilton 1M piping tips for precise rivers.
British Victoria Sponge
The British take on this cake swaps cream cheese frosting for clotted cream and replaces strawberry filling with strawberry jam (think Sainsbury's or Tesco brands). The sponge itself is often slightly denser, using self-raising flour and buttermilk for moisture. For an authentic touch, brush the cake layers with strawberry syrup before assembly. The rivers become whipped cream swirls instead of frosting—light and airy. A Victoria sponge cake tin makes this version foolproof.
Italian Tiramisu Fusion
Here's where things get creative: replace the strawberry filling with a mascarpone-strawberry layer, and the frosting rivers become espresso-infused cream cheese with crushed amaretti cookies mixed in. The sponge stays genoise-style but gets a boost of 1 tbsp coffee liqueur in the batter. Top with thinly sliced strawberries and a dusting of powdered sugar for an Italian café vibe. This version pairs beautifully with Italian espresso—trust me, it's a game-changer. 🍫
German Black Forest Twist
For a German-inspired take, add chocolate shavings to the strawberry filling and infuse the frosting rivers with dark chocolate and kirsch (cherry brandy). The sponge gets a hint of cocoa powder and almond extract for depth. Top with whipped cream and cherry compote for a Black Forest cake vibe. I use Godiva chocolate for the shavings—it melts beautifully. Serve with a side of German coffee for the full experience.
Japanese Matcha Strawberry
The Japanese version incorporates matcha powder into the sponge for a subtle earthy note, while the strawberry filling gets a touch of yuzu zest. The frosting rivers become white chocolate cream cheese with matcha dust swirled in. Top with edible gold leaf and strawberry blossoms for a luxurious finish. This cake is all about contrast—the bitterness of matcha balances the sweet strawberries perfectly. Use high-quality Japanese matcha like Ippodo Tea for the best results. ✨
Nutrition facts
Frequently asked questions
Can I make this cake without fresh strawberries?
Yes! For the filling, use 1 cup frozen strawberries (thawed and drained) or 1 cup strawberry jam mixed with 1 tbsp lemon juice. For extra flavor, add ½ tsp strawberry extract to the sponge batter. The texture will be slightly different, but still delicious.
How do I prevent soggy middle layers?
This is all about timing! Let your cake layers cool completely before adding filling, and chill the assembled cake for 30 minutes before adding frosting rivers. Also, use a thick strawberry filling (jam-like consistency) rather than juicy fresh berries to minimize moisture transfer.
Can I bake this cake in advance?
Bake the cake layers 1-2 days ahead and store them wrapped in plastic at room temperature. Assemble the cake 4-6 hours before serving to let flavors meld. The frosting rivers will look even more impressive after chilling overnight.
What's the secret to perfect frosting rivers?
Use a sharp knife or offset spatula to cut ¼-inch deep channels through the frosting. Fill immediately with extra frosting using a piping bag or spatula. Work quickly but carefully—if the frosting melts too much, chill the cake for 10 minutes before adding rivers.
How do I store leftovers?
Cover tightly with plastic wrap and store at room temperature for 2 days, or refrigerate for up to 5 days. For longer storage, freeze slices wrapped individually for up to 2 months. Let frozen cake thaw at room temperature before serving.